Getting Started with the Fovia XStream® HDVR® WebSDK
This page provides everything you need for getting started with the
XStream® HDVR® WebSDK 2.0.
- Overview
- Running the XStream HDVR WebSDK
- Exploring the XStream HDVR WebSDK
- Release Notes
- Distribution File Structure
- Example XStream HDVR WebSDK Applications
- Configuring SSL
- Configuration app
Overview
The XStream HDVR WebSDK adds a rich layer to the SDK Application Stack that provides a client-side JavaScript API for integrating the XStream HDVR rendering engine into your application. This platform provides rapid application development to create rich zero-download web applications across a variety of platforms and mobile devices (including iOS, Android, and Windows Phone platforms). XStream HDVR WebSDK runs on web browsers, tablets (via HTML5) or embedded inside native applications using a JavaScript container such as Electron or other native frameworks.
Recommended browsers include Chrome, Firefox, Microsoft Edge, IE11, IE10, and Safari (Mac). While the example applications are written in HTML5, the API does not explicitly require HTML5. The HTML4 IMG (image) tag may be used in place of the HTML5 Canvas tag.
To maximize your integration efforts, we recommend that you begin by browsing through the full contents of the XStream HDVR WebSDK Documentation, and don’t hesitate to contact a Fovia representative if you have any questions.
Running the XStream HDVR WebSDK
Be sure to copy your existing hdrclic.dat file into the foviaserver directory. If you require a license, please contact your Fovia representative for a new license file. The top-level directory contains one executable: FoviaLauncher.exe. This launches the XStream HDVR WebSDK server and adds a System Tray icon that provides access the system logging information, and to exit the application. It is important that XStream HDVR WebSDK server is always launched using the FoviaLauncher.exe since it manages multiple processes, which includes the foviaserver/foviawebsdk.exe process. To activate the XStream HDVR WebSDK server, the license file (hdrclic.dat) must be placed inside the foviaserver sub-directory. The contents of the file distribution are described below. The first time the application is run, the Windows Firewall may display a prompt to permit the WebSDK to access the network:
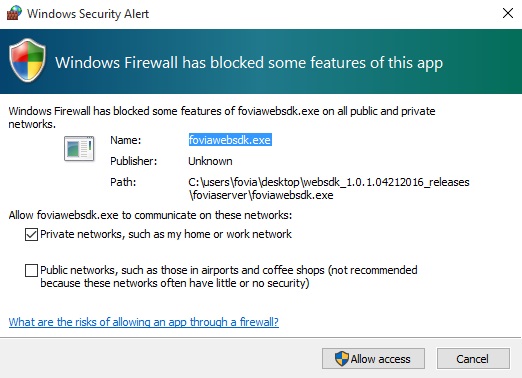
Click Allow Access and continue. Upon a successful launch of the XStream HDVR WebSDK server, enter localhost:8088/apps/hellofovia on your the browser on the system running the web server. If running on a separate server, replace localhost with your server IP address of the system running the XStream HDVR WebSDK server. Left and right-click mouse operations allow manipulation of the volume. If using a mobile device with this server, standard touch gestures are supported.
Exploring the XStream HDVR WebSDK
The best way to learn about the XStream HDVR WebSDK is to use the examples, and explore the source code. A variety of examples are provided, along with complete source code. The following example applications are located inside foviaserver\public\apps. It would be useful to look at each one in sequence, as each builds on the previous examples. Additional details are provided below in the Web Application Examples section.- hellofovia\hellofovia.js -- minimal lines of code to get an active volume displayed
- hellofovia\mip.js -- MIP example
- hellofovia\preset.js -- loading of presets and enabling of slab mode
- cvr\cvr.js -- color volume rendering including a flythrough
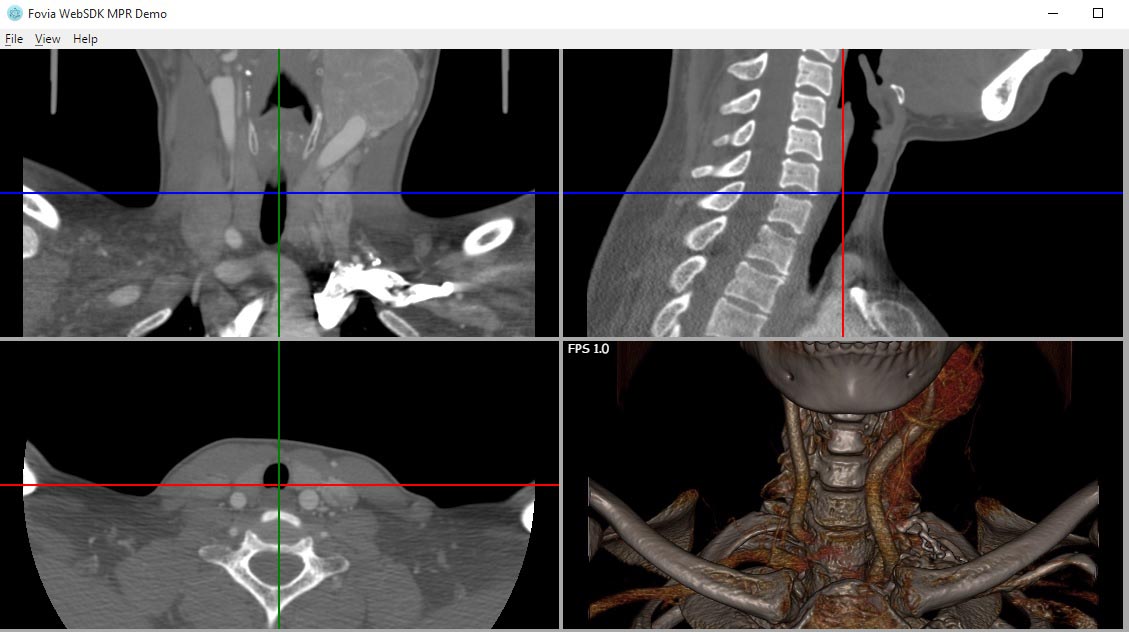
- mpr\mpr.js -- orthogonal MPR 4-vview
- oblique\oblique.js -- oblique MPR 4-view
- segment\segment.js -- interactive segmentation example
- polygon\polygon.js -- polygon segmentation example
- slab\slab.js -- example to create cut planes and slab views
- customload\customload.js -- example to load data using a custom loader
The API documentation can be found in XStream HDVR WebSDK Documentation.
Release Notes
Version 2.0
- Added Segmentation API
- Added Polygon API
- Created an asynchronous scrolling adaptor that can be easily incorporated into 2D/MPR applications
- Expose full RENDER_PARAMS structure, support loading and saving of XML presets
- Include the RENDER_PARAMS structure with each image returned to the client, provides the complete rendering state of the current image.
- Remove the necessity to call render() at least one time prior to a renderFinal()
- Added SSL support for communication between client and server
- Moved all configuration files into a single "config\configuration.xml"
- Moved all datasets, presets, and sample data to "data\"
Version 1.0.1
- Created System Tray icon for monitoring of the XStream HDVR WebSDK server; menu provides access to system logging information
- Label log messages to indicate if generated from client or server API
- Extend FoviaAPI.requestServerConnection to accept a disconnect session handler that is called when the session times out or connection to the server is lost
- Extend FoviaAPI.requestServerConnection to accept a global error handler that is call when an unrecoverable system error (an unlikely case in production environments, but should still be handled)
- Added a default session timeout in properties.cfg (default value is 0, never timeout)
- Upgraded internally to Node.js 0.12.13 (most recent "0.12" LTS)
- Exposed lower-level Fovia API, including ServerContext.createOctree and ServerContext.createRenderEngine
- Provided public\apps\hellofovia\lowlevel.js/html example apps for creating a basic HTML5 element, without using Fovia.UI.HTMLViewport container
Version 1.0
- First release of the XStream HDVR WebSDK
Distribution File Structure
The file structure for the WebSDK distribution is listed below in two sections: the first is required for your own distribution. The second section contains examples and documentation that should not be included in the distribution to your customers.Public Redistributables
- FoviaLauncher.exe -- XStream HDVR WebSDK Web Server
- foviaserver\
- foviaserver\foviawebsdk.exe -- part of the web server, this should not be executed directly
- foviaserver\hdrclic.dat -- place your license file into this directory
- foviaserver\config\configuration.xml
- foviaserver\config\FoviaLauncher.config
- foviaserver\logs - location of all log files
- foviaserver\nodeaddons - native components, including the required Microsoft redistributable DLLs
- foviaserver\data\presets
- foviaserver\public\error.html
- foviaserver\public\favicon.ico
- foviaserver\public\foviaAPI.js -- minimized JavaScript, should be included in your distribution
- foviaserver\public\scripts
- foviaserver\public\apps -- location of your web applications
Documentation and Examples
This documentation should not be distributed outside of your organization.- FoviaWebSDK_Documentation.html
- documentation\
- foviaserver\data\democases
- foviaserver\data\presets -- you may want to include these in your distribution
- foviaserver\data\polygons
- foviaserver\data\workspaces
- foviaserver\public\foviaAPI.d.ts
- foviaserver\public\foviaAPI.js.full -- full JavaScript version for debugging purpsoes. Do not include in your distribution
- foviaserver\public\apps\customload
- foviaserver\public\apps\cvr
- foviaserver\public\apps\hellofovia
- foviaserver\public\apps\mpr
- foviaserver\public\apps\oblique
- foviaserver\public\apps\polygon
- foviaserver\public\apps\sandbox
- foviaserver\public\apps\segment
- foviaserver\public\apps\slab
- foviaserver\public\apps\stats
- examples\
- examples\examples_readme.txt
- examples\electron\.electron
- examples\electron\electron.bat
- examples\staticpage\static.html
- examples\staticpage\static.js
- examples\customfunctions
Web Application Example XStream HDVR WebSDK Applications
The following section provides a brief overview for each of the example applications and introduces basic concept for learning the XStream HDVR WebSDK. Each one builds on the previous. It is suggested that you follow each one in sequence since the JavaScript code explains new concepts as they are introduced.
For convenience, links to the web app's HTML file and JavaScript are provided, so you can quickly navigate to the source code. The live URL assumes the server is running on the local machine. Otherwise, modify localhost to your server IP address running the XStream HDVR WebSDK server.
There are several basic "HelloFovia" examples, each of which introduce new concepts to consider when constructing your applications. This includes JavaScript vs. TypeScript, Promises vs. standard JavaScript callbacks, HTML5 Canvas vs IMG tags, and comparison of using Fovia.UI.HTMLViewport vs. lower level API RenderEngine classes.
Hello Fovia Example App
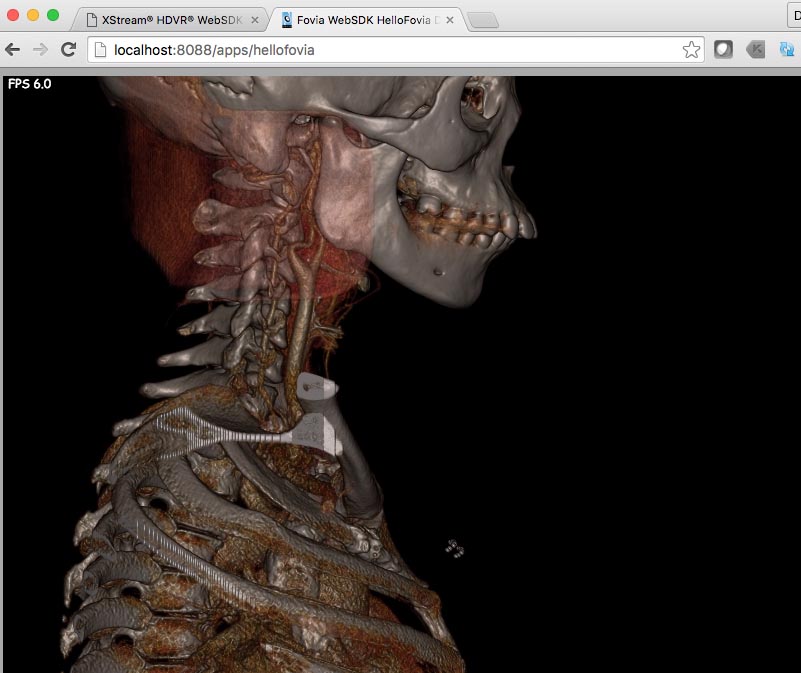
The following lines of code enable you to quickly add a live volume rendering window into any web page with the default bone preset. Default mouse and touch gestures adaptors are used. This is a good example for testing a standard color volume view on a mobile device. The minimal lines of HTML to display a Fovia enabled HTML5 canvase is:
<html>
    <head>
           <meta charset="UTF-8">
        <script src="/foviaAPI.js"></script>
        <script src="/apps/hellofovia/hellofovia.js"></script>
        <title>Fovia WebSDK HelloFovia Demo</title>
    </head>
    <body>
    <section id="HDVR">
        <canvas id="fovia"></canvas>
    </section>
    </body>
</html>
The minimal lines of JavaScript to render into the Fovia enabled HTML5 canvase is:Fovia.FoviaAPI.requestServerConnection(function (err) { Fovia.ServerContext.loadDICOMDir('data/democases/DICOM2').then(function (volumeDataContext) { var foviaViewport = new Fovia.UI.HTMLViewport("fovia",window.innerWidth,window.innerHeight); foviaViewport.initAndRender(volumeDataContext).then(function () { });
}); });
The HTML example must first include the XStream HDVR WebSDK client API (foviaAPI.js), and then the JavaScript of the example code. It defines a canvas with an ID of "fovia", which is referenced in the JavaScript.
The four lines of JavaScript do the real work. This uses the preferred design pattern of using Promises, rather than the classic JavaScript callbacks. While the last parameter to all methods take an optional callback, in place of the Promise, the Promise design pattern greatly simplifies the integration. Optional parameters take on default values and do not need to be specified. More importantly, multiple asynchronous tasks can be done together, rather than daisy chained.
One of the subsequent examples shows how to use JavaScript callbacks if this design pattern is preferred.
Fovia.FoviaAPI.requestServerConnection(function(err)
This will always be the first call into the client API. The only required parameter is the callback that is invoked upon a successful connection.
Fovia.ServerContext.loadDICOMDir('democases/DICOM2').then(function(volumeDataContext) {
This loads the example dataset from the democases folder. Typically, data will be loaded through your own custom data loader or the XStream HDVR WebSDK server will need direct access to the study, as in this example. This asynchronous call provides the volumeDataContext once the data has been loaded.
var foviaViewport = new Fovia.UI.HTMLViewport("fovia", window.innerWidth, window.innerHeight);
This creates a viewport container object that is associated with the HTML5 canvas element "fovia". HTMLViewport is the base viewport class. Additional functionality is provided by HTMLRepaintableViewport, HTMLDoubleBufferViewport and HTMLRepaintableDoubleBufferViewport that support various combinations of double buffer and the ability to repaint if this functionality is required by your application.
foviaViewport.initAndRender(volumeDataContext).then(function () {});
This asynchronous method initializes the container with the specified data and requests it to render itself.Basic Hello Fovia App
While the four lines of code are sufficient for a prototype, the example is expanded upon to show the additional suggested error checking.
View the source /foviaserver/public/apps/hellofovia/hellofoviaComplete.js
To run the example, in the URL localhost:8088/apps/hellofovia/hellofoviaComplete.html, change “localhost” to your server IP address, and enter the URL into your browser.Hello Fovia NoPromise (only using Callbacks) App
This is an example that shows the same code, but instead of using Promises, the last parameter is the callback. The API supports both Promises and callbacks. It should be noted that the Fovia API supports promises on older browsers, so there is no technical reason not to use the Promise design pattern.
View the source /foviaserver/public/apps/hellofovia/nopromise.js
To run the example, in the URL localhost:8088/apps/hellofovia/nopromise.html, change “localhost” to your server IP address, and enter the URL into your browser.Hello Fovia IMG Tag App
This example shows the same code, but instead of using the HTML5 Canvas tag, it uses the IMG tag. The JavaScript code example code is identical, since the ID for both Canvas and IMG is the same. Internal to the Web SDK, a check is made to determine how to render the final bits onto the display surface.
View the source /foviaserver/public/apps/hellofovia/hellofovia.js
To run the example, in the URL localhost:8088/apps/hellofovia/img.html, change “localhost” to your server IP address, and enter the URL into your browser.Hello Fovia TypeScript App
This example shows the same code, but in TypeScript. For larger applications, the use of TypeScript along with the supplied foviaAPI.d.ts will enable early detection of error in JavaScript code through type checking. It also supports intellisense for JavaScript in supported IDE’s including Visual Studio Code and WebStorm.
View the source /foviaserver/public/apps/hellofovia/typescript.ts
To run the example, in the URL localhost:8088/apps/hellofovia/typescript.html, change “localhost” to your server IP address, and enter the URL into your browser.Hello Fovia MIP App
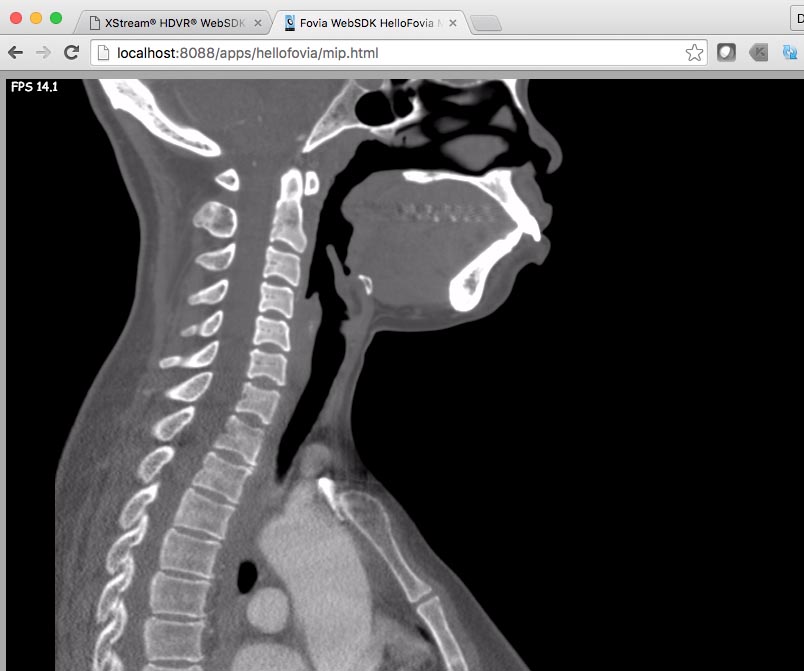
This example shows how to display a MIP view with an initial slab thickness of 0 (MPR). Default mouse and touch gestures adaptors are used except for scroll adaptor. This app uses a custom scroll adaptor written in TypeScript and transpiled to JavaScript. This shows the code to write a custom adaptor.
View the source /foviaserver/public/apps/hellofovia/mip.js
To run the example, in the URL localhost:8088/apps/hellofovia/mip.html, change “localhost” to your server IP address, and enter the URL into your browser.Hello Fovia Preset App
This example shows how to use the system presets. A single view is displayed. Press "p" to cycle thorugh the presets.
View the source /foviaserver/public/apps/hellofovia/preset.js
To run the example, in the URL localhost:8088/apps/hellofovia/preset.html, change “localhost” to your server IP address, and enter the URL into your browser.Hello Fovia Low Level App
Fovia.UI.HTMLViewport provides a higher level of abstraction, including rendering of data onto the display surface and handling of mouse and touch gestures. In some cases, customers may want to bypass this and go directly to the lower-level API. This example shows how to build a simple app (with more lines of code), by using createOctree, createRenerEngine, and directly interact with the HTML elements.
View the source /foviaserver/public/apps/hellofovia/lowlevel.js
To run the example, in the URL localhost:8088/apps/hellofovia/lowlevel.html, change “localhost” to your server IP address, and enter the URL into your browser.
Color Volume Rendering Example App
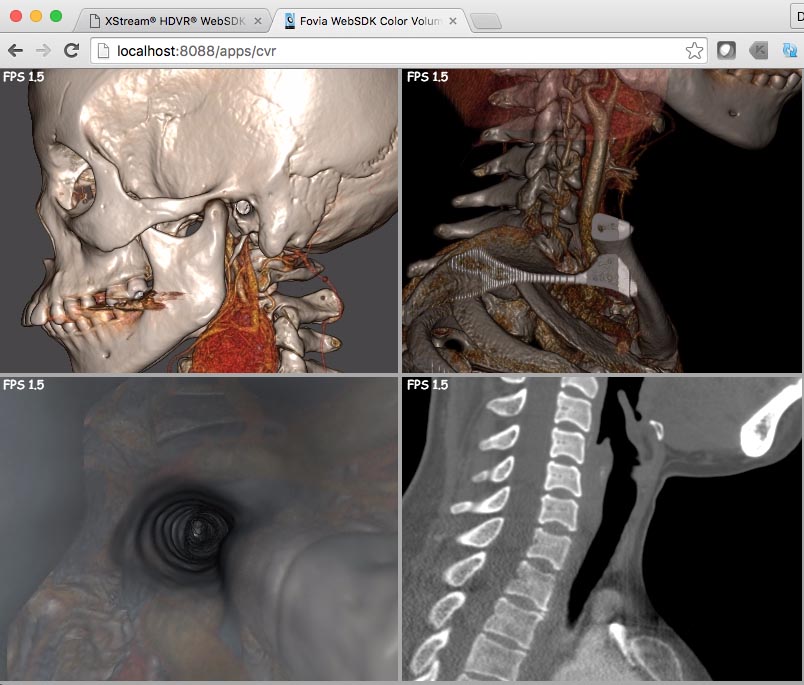
This example shows how to create a 2x2 layout, along with the following:
- use default and XML-based presets
- how to override default mouse behavior using Fovia.UI.HTMLViewport.setMouseAdaptor
- define a custom mouse adaptor using Fovia.UI.HTMLViewport.setCustomTouchAdaptor
- toggle between 1-up and 2x2 layout
- respond to a resize window event
View the source /foviaserver/public/apps/cvr/cvr.js
To run the example, in the URL localhost:8088/apps/cvr/, change “localhost” to your server IP address, and enter the URL into your browser.Orthogonal MPR Example App
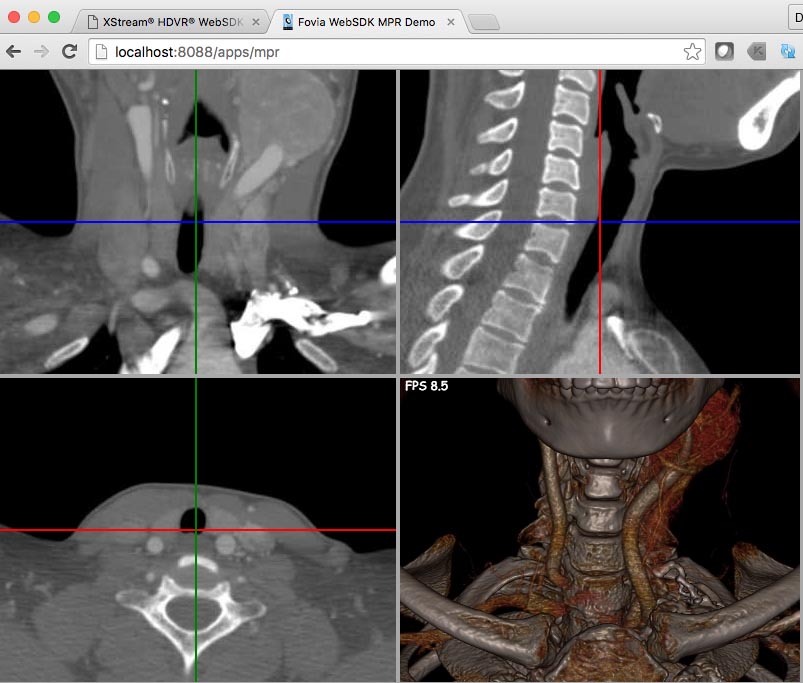
This example shows how to create a 2x2 layout, with a sagittal, axial, and coronal orthogonal views, along with the following:
- use the HTMLRepaintableDoubleBufferViewport for HTML viewport creation
- render cross-reference lines that are orthogonal to each other using the onDrawCallback specified in Fovia.UI.HTMLViewport.init()
- callbacks for linking view
- create a FoviaViewport that supports repaint() and double buffering
- add a window/level mouse adaptor
- example how to create a render parameters structure (XML preset) for a 3D view
- turn off FPS in viewport
- respond to a resize window event
- project a 3D point to 2D projection plane coordinates in parallel rendering mode
View the source /foviaserver/public/apps/mpr/mpr.js
To run the example, in the URL localhost:8088/apps/mpr/, change “localhost” to your server IP address, and enter the URL into your browser.Oblique MPR Example App
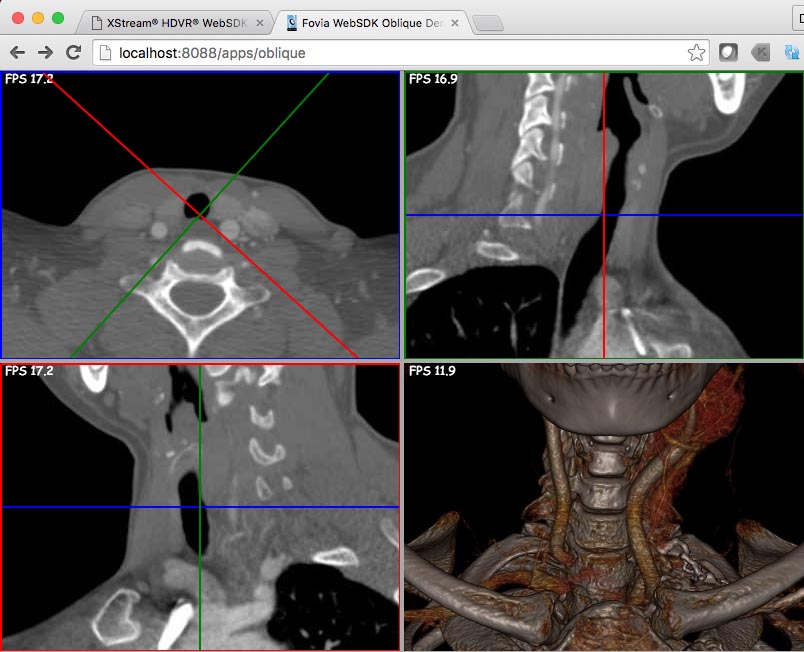
This example shows how to create a 2x2 layout, and manipulate the sagittal, axial, and coronal oblique views. It also uses the TypeScript based custom scroll adaptor earlier used in hellofovia/mip app. It allows you to create linked oblique views and scroll them using the custom adaptor.
View the source /foviaserver/public/apps/oblique/oblique.js
To run the example, in the URL localhost:8088/apps/oblique/, change “localhost” to your server IP address, and enter the URL into your browser.Interactive Segmentation App
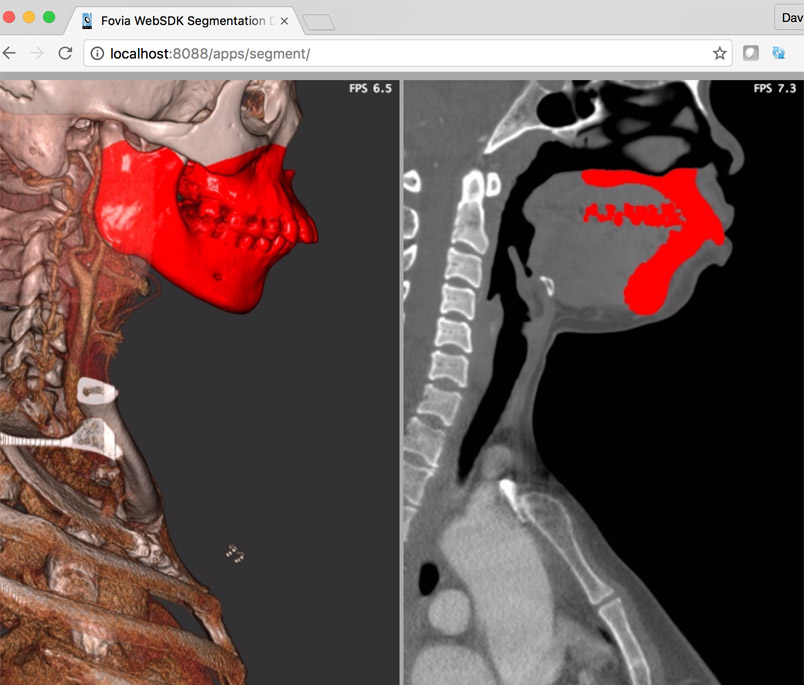
This example shows how to create a basic interactive segmentaiton application. Select the region you wish to segment and do a right-click drag. As you drag up, the region of the segmentation will increase. Drag right and left to increase or decrease the threshold. Results of the segmentation are displayed, and updated in the linked viewports.
View the source /foviaserver/public/apps/segment/segment.js
To run the example, in the URL localhost:8088/apps/segment/, change “localhost” to your server IP address, and enter the URL into your browser.Polygon Example App

This example shows how to load polygon objects into a scene and move them around. Use right-click to rotate, shift-right-click to move, and ctrl-right-click to resize.
View the source /foviaserver/public/apps/polygon/polygon.js
To run the example, and enter one of the URLs into your browser and change “localhost” to your server IP addressExamples to run include:
OBJ generic dental implant: http: //localhost:8088/apps/polygon/ STL generic hip stem implant: http: //localhost:8088/apps/polygon?type=stl OBj Cube with separate texture map: http: //localhost:8088/apps/polygon?type=texture
Slab Example App
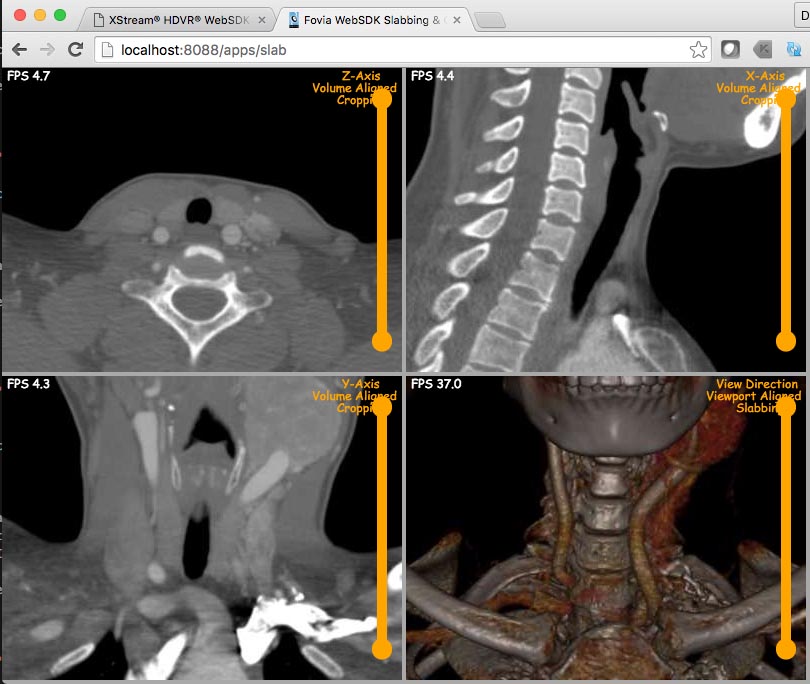
This example shows how to crop and slab views, and update the linked viewports. It also shows option to pass on mouse events to registered mouse handler or intercept them using custom mouse handlers. The function call Fovia.UI.HTMLViewport.setOverrideTouchAdaptor usage is included in the app for this.
View the source /foviaserver/public/apps/slab/slab.js
To run the example, in the URL localhost:8088/apps/slab/, change “localhost” to your server IP address, and enter the URL into your browser.Custom Data Loading Example App

This example shows how to load a custom dataset. In order for the app to run, the raw.zip should be unzipped. It is located under democases folder in your delivery.
View the source /foviaserver/public/apps/customload/customload.js
To run the example, in the URL localhost:8088/apps/customload/, change “localhost” to your server IP address, and enter the URL into your browser.Creating a native custom loader
The examples\customfunctions directory provides an example to create a custom native data loader. Follow this example, and the MSDev project to build a DLL to utilize your own custom DICOM loader and will replace FoviaCustomFunctions.dll inside foviaserver\nodeaddons. It is important that the MSDev project is set to x64. This example DLL is used with the foviaserver/public/apps/customload example app.
Running inside a native container
The examples\electron directory contains the Electron app that launches an example through a cross-platform desktop applications framework using JavaScript, HTML, and CSS. Once the XStream HDVR WebSDK server is running, simply click on the Electron.bat file to run the example outside the web browser.
Running in a static HTML page
The examples\staticpage directory contains an example static HTML page that can be launched from a local file system against the XStream HDVR WebSDK server running locally (localhost), rather than served up from the remote web server.
View the source example/staticpage/static.js To run the example, open up the following HTML page: /foviaserver/examples/staticpage/static.html in your browser.
Configuring SSL
The XStream HDVR WebSDK server can be easily configured to use SSL by updating the useSSL and nodePortSSL fields in the config/configuration.xml. As an example, when you change useSSL to 1 and restart the server and view the hellofovia app through a secure connection using a slightly modified example shown below.
View the source /foviaserver/public/apps/hellofovia/hellofoviassl.js
To run the example, in the URL localhost:8088/apps/hellofovia/lowlevel.html, change “localhost” to your server IP address, and enter the URL into your browser.In a production environment, replace the demo server.crt and server.keys that are provided in the foviaserver/ssl directory with your company's official certificate.
Configuration Demo App
This example uses the basic hellowfovia.js example to illustrate the various settings and debugging options that is used to configure the XStream HDVR WebSDK server, either using the client-side API, or through the config/configuration.xml file.
configuration.xml
Changes to any value requires a restart of the XStream HDVR WebSDK server. The supplied file includes the default values. These properties are set on a global server level, but can be specified "per application" if desired as shown in hellofovia/config.js.
The "urls" tag contains a list of strings (relative file paths) that will be appended to foviaserver/public. XStream HDVR WebSDK binds the URL to these directories. The ones provided match precisely with the distribution’s foviaserver/public. The ":id" qualifier allows a default "index.html" file to be specified. For example, /apps/hellofovia/:id allows /apps/hellofovia/ to be mapped to /apps/hellofovia/hellofovia.html. For production environments, only public visible directories should be listed. Ensure that "/scripts/:id" is included since this is required for internal purposes.
Debugging
Debugging is typically done through various browsers or an IDE. IntelliSense is possible by simply including the provided ".d.ts" file in the first line of your application as shown below.The Fovia.Logger package provides basic logging functionality that can be configured in a similar manner to "log4j". In addition to controlling the level of debugging (debug, info, warn, error) for what appears in the browser console, all messages are also sent to the foviaserver/log/foviaServer_ddmmyyyy_hhmmss.log file.
View the source /foviaserver/public/apps/hellofovia/config.js
To run the example, in the URL localhost:8088/apps/hellofovia/config.html, change “localhost” to your server IP address, and enter the URL into your browser. -->