Summary
The XStream® HDVR® software distrbution includes a sample Workstation application which demonstrates the various features and capabilities of the XStream HDVR SDK. This application is a good starting point for familiarizing one's self with the features of the SDK and how they work together to make an end-user application. The Workstation is written in Java, so a suitable JRE must be installed on the system prior to running the Workstation.
Getting Started
Prior to exploring the APIs, we recommend that you first confirm that the Fovia Client-Server Demo Application runs in your environment.
The Fovia Client-Server Demo Application is designed to test XStream HDVR performance and compare your implementation to ours, enabling you to determine whether your integration of the engine actually performs as expected. Direct use of the Fovia Client-Server Demo Workstation in connection with any medical or patient diagnosis, treatment or advice is strictly prohibited.
Check JRE Version
While Java is not required to build a thin client application using the C++ or .NET (C#) API, the Fovia Client-Server Demo Application requires that Java be installed. Check to ensure that you have the correct Java Runtime Environment installed. Launch the application-specific command window as follows:
Windows: From the Start menu search, enter “cmd” to open a command window.
Mac: From Spotlight, search and launch the “Terminal” application to open a command window.
Linux: Open a terminal window.
In the command window, enter “java -version” and confirm that build 1.6 or later is installed. If this results in an error or you are running an older version, please install Java 1.6 or later. Install either the 32 or 64 bit version of the JRE as appropriate to your operating system. Some 64 bit systems will allow a 32 bit JRE to be installed if this is desired.
Note: If the version information includes “Java HotSpot 64-Bit Server”, this indicates that you are running 64-bit JRE. Close the command window.
Launch Application Server
Navigate to the “Server Application” folder and launch the appropriate command:
Windows: Depending on the Java version specified above, select “Start Server 64-bit.bat” or “Start Server 32-bit.bat”.
Linux: Depending on the Java version specified above, select “Start Server 64-bit.sh” or “Start Server 32-bit.sh”.
Mac: Depending on the Java version specified above, select “Start Server 64-bit.command” or “Start Server 32-bit.command”.
Launch Client Server
Navigate to the “Client-Server Workstation Application” folder and launch the appropriate command:
Windows: Depending on the Java version specified above, select “Start Client 64-bit.bat” or “Start Client 32-bit.bat”.
Linux: Depending on the Java version specified above, select “Start Client 64-bit.sh” or “Start Client 32-bit.sh”.
Mac: Depending on the Java version specified above, select “Start Client 64-bit.command” or “Start Client 32-bit.command”.
Mac Only: If running the client and server on the same machine, the SDK will use shared memory buffers to transfer data. On a clean install of OSX, the operating system will disallow allocation of shared memory buffers of the size necessary for this feature. When running both client and server on OSX, it is advisable to install and run the following script to increase the allowed buffer size:
Download Fovia Shared Memory Startup Script
Configuration Settings
1. Upon launching the application, the following configuration dialog is displayed:
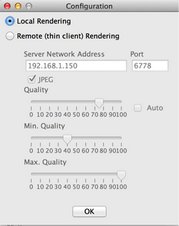
2. Select “Local Rendering” if running both client and server on the same system. If running this application in a client-server environment, launch the server application on a separate system and specify its IP address in this dialog. In the latter case, the JPEG option should be checked so the server will send compressed JPEG images rather than much larger uncompressed images.
3. Click the “OK” button.
4. The application should now be up and running.


